预配置 Microsoft OAuth 凭据
设置带有委托访问的 Microsoft Entra ID 应用注册 后,你可以使用凭据覆盖 在 n8n 启动时注入 Client ID 和 Client Secret。这意味着组织中的用户无需完成自己的 OAuth 应用注册即可连接到 Microsoft 服务。
n8n 支持三个用于凭据覆盖的环境变量。本指南使用 CREDENTIALS_OVERWRITE_DATA_FILE。有关完整的变量参考,请参阅凭据环境变量 。
创建凭据文件
在运行 n8n 的主机上,在与 docker-compose.yaml 相同的目录中创建一个名为 credentials-overwrite.json 的文件。
该文件包含一个以 n8n 凭据类型名称为键的 JSON 对象。例如,要预配置 Microsoft Outlook:
{
"microsoftOutlookOAuth2Api" : {
"clientId" : "YOUR_CLIENT_ID" ,
"clientSecret" : "YOUR_CLIENT_SECRET"
}
}
要同时预配置多个 Microsoft 服务,请将每个凭据类型作为单独的键添加:
{
"microsoftOutlookOAuth2Api" : {
"clientId" : "YOUR_CLIENT_ID" ,
"clientSecret" : "YOUR_CLIENT_SECRET"
},
"microsoftOneDriveOAuth2Api" : {
"clientId" : "YOUR_CLIENT_ID" ,
"clientSecret" : "YOUR_CLIENT_SECRET"
}
}
Minified JSON 压缩 JSON
n8n 要求 JSON 为压缩格式(不含空格或换行符)。以上示例为方便阅读而格式化。请确保实际文件不包含多余的空白字符:
{ "microsoftOutlookOAuth2Api" :{ "clientId" : "YOUR_CLIENT_ID" , "clientSecret" : "YOUR_CLIENT_SECRET" }}
有关每个 Microsoft 服务的凭据类型名称,请参阅按集成所需的范围 。
Docker Compose
将凭据文件作为只读卷挂载,并在 compose.yaml 中设置环境变量:
1
2
3
4
5
6
7
8
9
10
11
12
13
14
15
16
17
18
19
20
21
22
23
24 services :
n8n :
image : docker.n8n.io/n8nio/n8n:latest
container_name : n8n
restart : always
ports :
- "5678:5678"
environment :
- GENERIC_TIMEZONE=America/New_York
- TZ=America/New_York
- N8N_ENFORCE_SETTINGS_FILE_PERMISSIONS=true
- N8N_LOG_LEVEL=debug
- N8N_LOG_OUTPUT=file,console
- N8N_LOG_FILE_COUNT_MAX=5
- CREDENTIALS_OVERWRITE_DATA_FILE=/run/secrets/credentials-overwrite.json
volumes :
- n8n_data:/home/node/.n8n
- ./credentials-overwrite.json:/run/secrets/credentials-overwrite.json:ro
networks :
- default
volumes :
n8n_data :
name : ${N8N_VOLUME:-n8n_data}
external : true
通过重启容器来应用更改:
验证覆盖是否生效
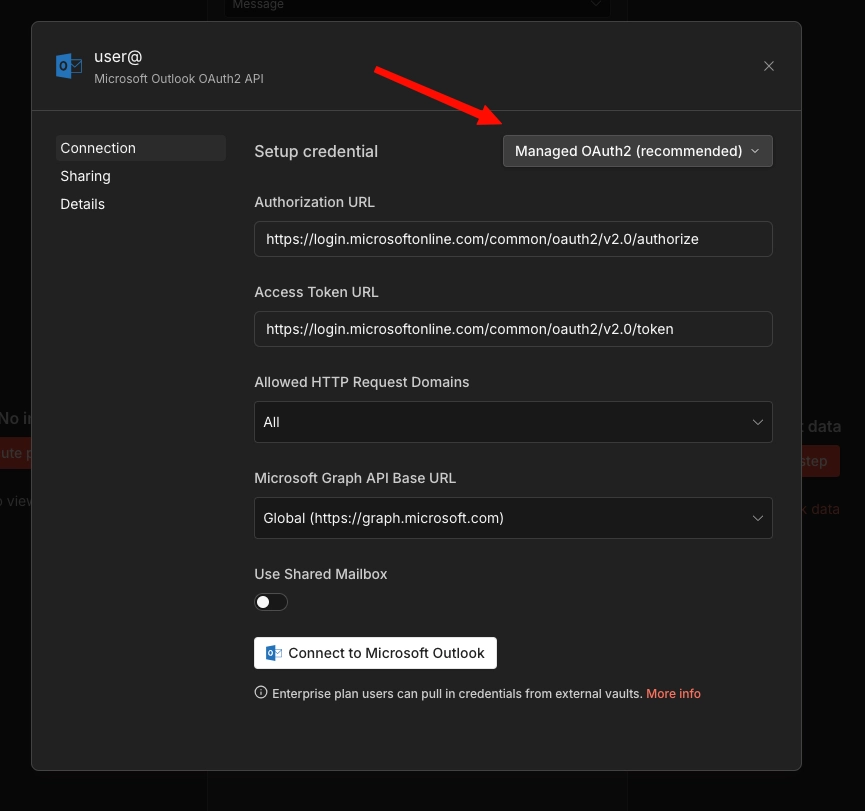
n8n 启动后,让用户为某个预配置的服务(例如 Microsoft Outlook)创建新凭据。他们应该能在凭据选择中看到 Managed OAuth2 (recommended) 托管 OAuth2(推荐) 选项。
用户可以点击 Connect to Microsoft Outlook 连接到 Microsoft Outlook ,无需认证。应该会出现 Account connected 账户已连接 消息。
如果 Managed OAuth 2 选项未出现,说明环境变量未正确应用。请检查卷挂载中的文件路径是否与 CREDENTIALS_OVERWRITE_DATA_FILE 的值匹配。
Kubernetes
对于 Kubernetes 部署,请用 Kubernetes 原生方式替代 Docker 卷挂载。具体方法因云提供商而异。请选择与你环境匹配的部分。
普通 Kubernetes Secret(EKS / AKS / GKE)
这种方法适用于所有三种托管 Kubernetes 提供商,无需额外依赖。
1. 创建 Secret:
apiVersion : v1
kind : Secret
metadata :
name : n8n-credentials-overwrite
namespace : your-namespace
type : Opaque
stringData :
credentials-overwrite.json : '{"microsoftOutlookOAuth2Api":{"clientId":"YOUR_CLIENT_ID","clientSecret":"YOUR_CLIENT_SECRET"}}'
2. 在 Deployment 中挂载 Secret:
 1
 2
 3
 4
 5
 6
 7
 8
 9
10
11
12
13
14
15
16
17 spec :
containers :
- name : n8n
image : docker.n8n.io/n8nio/n8n:latest
env :
- name : CREDENTIALS_OVERWRITE_DATA_FILE
value : /run/secrets/credentials-overwrite.json
# ...your other env vars
volumeMounts :
- name : credentials-overwrite
mountPath : /run/secrets/credentials-overwrite.json
subPath : credentials-overwrite.json
readOnly : true
volumes :
- name : credentials-overwrite
secret :
secretName : n8n-credentials-overwrite
subPath 字段很重要。如果没有它,Kubernetes 会替换整个 /run/secrets/ 目录,而不是仅挂载单个文件。
替代方案:内联环境变量
要跳过卷挂载,可以直接将 Secret 作为环境变量引用:
env :
- name : CREDENTIALS_OVERWRITE_DATA
valueFrom :
secretKeyRef :
name : n8n-credentials-overwrite
key : credentials-overwrite.json
stringData :
credentials-json : '{"microsoftOutlookOAuth2Api":{"clientId":"...","clientSecret":"..."}}'
对于单服务设置,这种方式更简洁,但请注意某些 Kubernetes 环境会限制环境变量大小(例如,每个变量限制为 128KB)。如果你有大量凭据覆盖,基于文件的方法更安全。
AWS Secrets Manager(EKS)
这种方法使用 AWS Secrets Store CSI Driver 将 AWS Secrets Manager 中的密钥直接挂载到 Pod 中。它增加了轮换支持、CloudTrail 审计日志和集中式密钥管理。
前置条件:
集群上已安装 Secrets Store CSI Driver 和 ASCP(AWS Secrets and Configuration Provider)
集群已配置 IAM OIDC 提供者(IRSA 所需)
具有 secretsmanager:GetSecretValue 和 secretsmanager:DescribeSecret 权限的 IAM 角色
1. 在 AWS Secrets Manager 中创建密钥:
aws secretsmanager create-secret \
--name n8n/credentials-overwrite \
--description "n8n credential overwrites for Microsoft OAuth" \
--secret-string '{"microsoftOutlookOAuth2Api":{"clientId":"YOUR_CLIENT_ID","clientSecret":"YOUR_CLIENT_SECRET"}}'
2. 创建 IAM 策略:
1
2
3
4
5
6
7
8
9
10
11
12
13 {
"Version" : "2012-10-17" ,
"Statement" : [
{
"Effect" : "Allow" ,
"Action" : [
"secretsmanager:GetSecretValue" ,
"secretsmanager:DescribeSecret"
],
"Resource" : "arn:aws:secretsmanager:REGION:ACCOUNT_ID:secret:n8n/credentials-overwrite-*"
}
]
}
aws iam create-policy \
--policy-name n8n-credentials-overwrite-read \
--policy-document file://policy.json
3. 使用 IRSA 创建服务账户:
eksctl create iamserviceaccount \
--name n8n-sa \
--namespace your-namespace \
--cluster your-cluster \
--attach-policy-arn arn:aws:iam::ACCOUNT_ID:policy/n8n-credentials-overwrite-read \
--approve
4. 创建 SecretProviderClass:
1
2
3
4
5
6
7
8
9
10
11
12 apiVersion : secrets-store.csi.x-k8s.io/v1
kind : SecretProviderClass
metadata :
name : n8n-credentials-overwrite
namespace : your-namespace
spec :
provider : aws
parameters :
objects : |
- objectName: "n8n/credentials-overwrite"
objectType: "secretsmanager"
objectAlias: "credentials-overwrite.json"
5. 更新你的 n8n Deployment:
 1
 2
 3
 4
 5
 6
 7
 8
 9
10
11
12
13
14
15
16
17
18
19
20
21
22
23
24
25
26
27 apiVersion : apps/v1
kind : Deployment
metadata :
name : n8n
namespace : your-namespace
spec :
template :
spec :
serviceAccountName : n8n-sa
containers :
- name : n8n
image : docker.n8n.io/n8nio/n8n:latest
env :
- name : CREDENTIALS_OVERWRITE_DATA_FILE
value : /run/secrets/credentials-overwrite.json
volumeMounts :
- name : credentials-overwrite
mountPath : /run/secrets/credentials-overwrite.json
subPath : credentials-overwrite.json
readOnly : true
volumes :
- name : credentials-overwrite
csi :
driver : secrets-store.csi.k8s.io
readOnly : true
volumeAttributes :
secretProviderClass : n8n-credentials-overwrite
轮换密钥:
要更新凭据,请在 Secrets Manager 中更新值:
aws secretsmanager update-secret \
--secret-id n8n/credentials-overwrite \
--secret-string '{"microsoftOutlookOAuth2Api":{"clientId":"NEW_CLIENT_ID","clientSecret":"NEW_CLIENT_SECRET"}}'
CSI driver 会按其轮询间隔同步更新的值(默认两分钟)。重启 n8n Pod 以使 n8n 读取更新后的文件,因为 n8n 在启动时读取凭据文件。
Azure Key Vault(AKS)
这种方法使用 Azure Key Vault Provider for the Secrets Store CSI Driver 将 Azure Key Vault 中的密钥挂载到 Pod 中。
前置条件:
AKS 集群上已启用 Secrets Store CSI Driver 和 Azure Key Vault Provider 插件
一个 Azure Key Vault 实例
具有 vault 访问权限的托管标识或服务主体
集群上已启用 Workload Identity(推荐使用,而非 pod identity)
1. 创建或使用现有的 Key Vault:
az keyvault create \
--name n8n-credentials-vault \
--resource-group your-resource-group \
--location your-region
2. 在 Key Vault 中创建密钥:
az keyvault secret set \
--vault-name n8n-credentials-vault \
--name n8n-credentials-overwrite \
--value '{"microsoftOutlookOAuth2Api":{"clientId":"YOUR_CLIENT_ID","clientSecret":"YOUR_CLIENT_SECRET"}}'
3. 设置 Workload Identity:
创建托管标识并建立联合凭据:
1
2
3
4
5
6
7
8
9
10
11
12
13
14
15
16
17
18
19
20
21
22
23
24
25
26
27
28
29
30
31 # Create a managed identity
az identity create \
--name n8n-workload-identity \
--resource-group your-resource-group \
--location your-region
# Get the identity client ID
CLIENT_ID = $( az identity show \
--name n8n-workload-identity \
--resource-group your-resource-group \
--query clientId -o tsv)
# Grant the identity access to the Key Vault
az keyvault set-policy \
--name n8n-credentials-vault \
--secret-permissions get \
--spn " $CLIENT_ID "
# Get the OIDC issuer URL for your cluster
OIDC_ISSUER = $( az aks show \
--name your-cluster \
--resource-group your-resource-group \
--query "oidcIssuerProfile.issuerUrl" -o tsv)
# Create the federated credential
az identity credential create \
--name n8n-workload-identity \
--resource-group your-resource-group \
--issuer " $OIDC_ISSUER " \
--subject system:serviceaccount:your-namespace:n8n-sa \
--audience api://AzureADTokenExchange
4. 创建 Kubernetes ServiceAccount:
apiVersion : v1
kind : ServiceAccount
metadata :
name : n8n-sa
namespace : your-namespace
annotations :
azure.workload.identity/client-id : "YOUR_MANAGED_IDENTITY_CLIENT_ID"
labels :
azure.workload.identity/use : "true"
5. 创建 SecretProviderClass:
 1
 2
 3
 4
 5
 6
 7
 8
 9
10
11
12
13
14
15
16
17
18
19 apiVersion : secrets-store.csi.x-k8s.io/v1
kind : SecretProviderClass
metadata :
name : n8n-credentials-overwrite
namespace : your-namespace
spec :
provider : azure
parameters :
usePodIdentity : "false"
useWorkloadIdentity : "true"
clientID : "YOUR_MANAGED_IDENTITY_CLIENT_ID"
keyvaultName : "n8n-credentials-vault"
objects : |
array:
- |
objectName: n8n-credentials-overwrite
objectType: secret
objectAlias: credentials-overwrite.json
tenantId : "YOUR_TENANT_ID"
6. 更新你的 n8n Deployment:
1
2
3
4
5
6
7
8
9
10
11
12
13
14
15
16
17
18
19
20
21
22
23
24
25
26
27 apiVersion : apps/v1
kind : Deployment
metadata :
name : n8n
namespace : your-namespace
spec :
template :
spec :
serviceAccountName : n8n-sa
containers :
- name : n8n
image : docker.n8n.io/n8nio/n8n:latest
env :
- name : CREDENTIALS_OVERWRITE_DATA_FILE
value : /run/secrets/credentials-overwrite.json
volumeMounts :
- name : credentials-overwrite
mountPath : /run/secrets/credentials-overwrite.json
subPath : credentials-overwrite.json
readOnly : true
volumes :
- name : credentials-overwrite
csi :
driver : secrets-store.csi.k8s.io
readOnly : true
volumeAttributes :
secretProviderClass : n8n-credentials-overwrite
轮换密钥:
az keyvault secret set \
--vault-name n8n-credentials-vault \
--name n8n-credentials-overwrite \
--value '{"microsoftOutlookOAuth2Api":{"clientId":"NEW_CLIENT_ID","clientSecret":"NEW_CLIENT_SECRET"}}'
CSI driver 会按其轮询间隔同步(默认两分钟)。之后重启 n8n Pod 以使 n8n 获取更新后的文件。
Google Secret Manager(GKE)
这种方法使用 GCP provider for the Secrets Store CSI Driver 将 Google Secret Manager 中的密钥挂载到 Pod 中。
前置条件:
已启用 Workload Identity Federation 的 GKE 集群
项目上已启用 Secret Manager API
具有 secretmanager.secretAccessor 角色的 Google 服务账户
1. 启用 Secret Manager API:
gcloud services enable secretmanager.googleapis.com \
--project your-project-id
2. 创建密钥:
echo -n '{"microsoftOutlookOAuth2Api":{"clientId":"YOUR_CLIENT_ID","clientSecret":"YOUR_CLIENT_SECRET"}}' | \
gcloud secrets create n8n-credentials-overwrite \
--data-file= - \
--project your-project-id
3. 设置 Workload Identity Federation:
1
2
3
4
5
6
7
8
9
10
11
12
13
14
15
16 # Create a Google service account
gcloud iam service-accounts create n8n-secret-reader \
--display-name= "n8n Secret Reader" \
--project your-project-id
# Grant it access to the secret
gcloud secrets add-iam-policy-binding n8n-credentials-overwrite \
--member= "serviceAccount:[email protected] " \
--role= "roles/secretmanager.secretAccessor" \
--project your-project-id
# Bind the Kubernetes service account to the Google service account
gcloud iam service-accounts add-iam-policy-binding \
[email protected] \
--role= "roles/iam.workloadIdentityUser" \
--member= "serviceAccount:your-project-id.svc.id.goog[your-namespace/n8n-sa]"
4. 创建 Kubernetes ServiceAccount:
apiVersion : v1
kind : ServiceAccount
metadata :
name : n8n-sa
namespace : your-namespace
annotations :
iam.gke.io/gcp-service-account : [email protected]
5. 安装 CSI Driver 和 GCP provider:
# Install the CSI driver
helm repo add secrets-store-csi-driver https://kubernetes-sigs.github.io/secrets-store-csi-driver/charts
helm install csi-secrets-store secrets-store-csi-driver/secrets-store-csi-driver \
--namespace kube-system
# Install the GCP provider
kubectl apply -f https://raw.githubusercontent.com/GoogleCloudPlatform/secrets-store-csi-driver-provider-gcp/main/deploy/provider-gcp-plugin.yaml
6. 创建 SecretProviderClass:
apiVersion : secrets-store.csi.x-k8s.io/v1
kind : SecretProviderClass
metadata :
name : n8n-credentials-overwrite
namespace : your-namespace
spec :
provider : gcp
parameters :
secrets : |
- resourceName: "projects/your-project-id/secrets/n8n-credentials-overwrite/versions/latest"
path: "credentials-overwrite.json"
7. 更新你的 n8n Deployment:
1
2
3
4
5
6
7
8
9
10
11
12
13
14
15
16
17
18
19
20
21
22
23
24
25
26
27 apiVersion : apps/v1
kind : Deployment
metadata :
name : n8n
namespace : your-namespace
spec :
template :
spec :
serviceAccountName : n8n-sa
containers :
- name : n8n
image : docker.n8n.io/n8nio/n8n:latest
env :
- name : CREDENTIALS_OVERWRITE_DATA_FILE
value : /run/secrets/credentials-overwrite.json
volumeMounts :
- name : credentials-overwrite
mountPath : /run/secrets/credentials-overwrite.json
subPath : credentials-overwrite.json
readOnly : true
volumes :
- name : credentials-overwrite
csi :
driver : secrets-store.csi.k8s.io
readOnly : true
volumeAttributes :
secretProviderClass : n8n-credentials-overwrite
轮换密钥:
创建密钥的新版本:
echo -n '{"microsoftOutlookOAuth2Api":{"clientId":"NEW_CLIENT_ID","clientSecret":"NEW_CLIENT_SECRET"}}' | \
gcloud secrets versions add n8n-credentials-overwrite \
--data-file= - \
--project your-project-id
由于 SecretProviderClass 引用了 versions/latest,CSI driver 会在下次同步时获取新版本。重启 n8n Pod 以使 n8n 读取更新后的文件。