Skip to content

嵌入中的工作流管理#

功能可用性

嵌入功能需要嵌入许可证。有关何时使用嵌入功能以及成本和许可流程的更多信息,请参阅 n8n 网站上的嵌入功能

在管理跨团队或组织的嵌入式 n8n 部署时,您可能需要为多个用户运行相同(或类似)的工作流。有两个可用选项:

解决方案 优点 缺点
为每个用户创建工作流 对工作流如何启动没有限制(可以使用任何触发器) 需要管理多个工作流。
创建单个工作流,并在执行时传递用户凭据 简化工作流管理(只需更改一个工作流)。 要运行工作流,您的产品必须调用它

Warning

本文档中引用的 API 可能随时更改。请确保在每次版本升级时检查持续功能。

每用户工作流#

有三个一般步骤要遵循:

  • 获取每个用户的凭据,以及根据工作流可能需要的任何其他参数。
  • 为此用户创建 n8n 凭据
  • 创建工作流。

1. 获取用户凭据#

在这里,您需要捕获此用户必须进行身份验证的任何节点/服务的所有凭据,以及特定工作流所需的任何其他参数。所需的凭据和任何参数将取决于您的工作流和您要尝试做的事情。

2. 创建用户凭据#

After all relevant credential details have been obtained, you can proceed to create the relevant service credentials in n8n. This can be done using the Editor UI or API call.

Using the Editor UI#

  1. From the menu select Credentials > New.
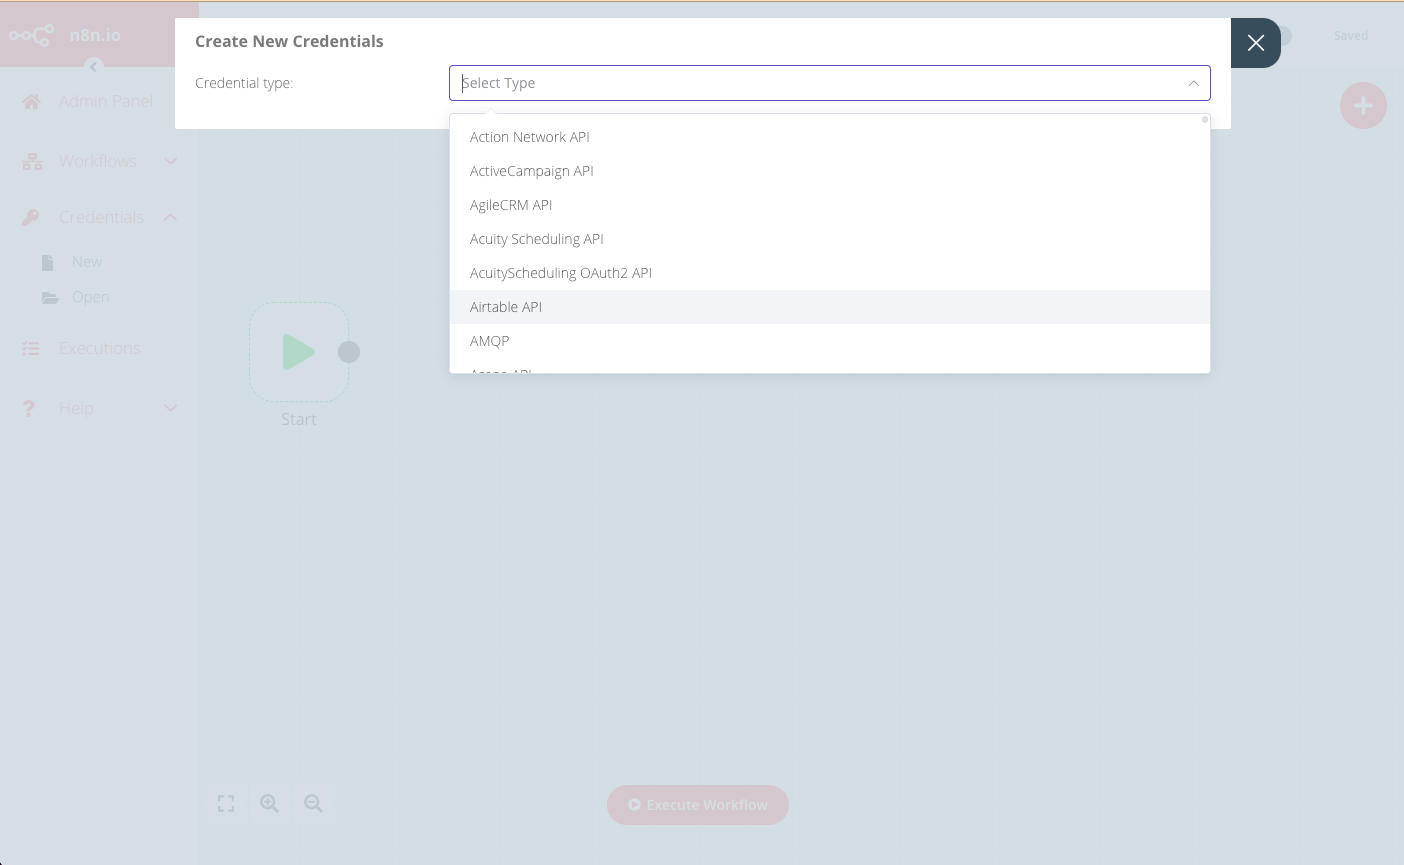
  2. Use the drop-down to select the Credential type to create, for example Airtable. Create New Credentials drop-down
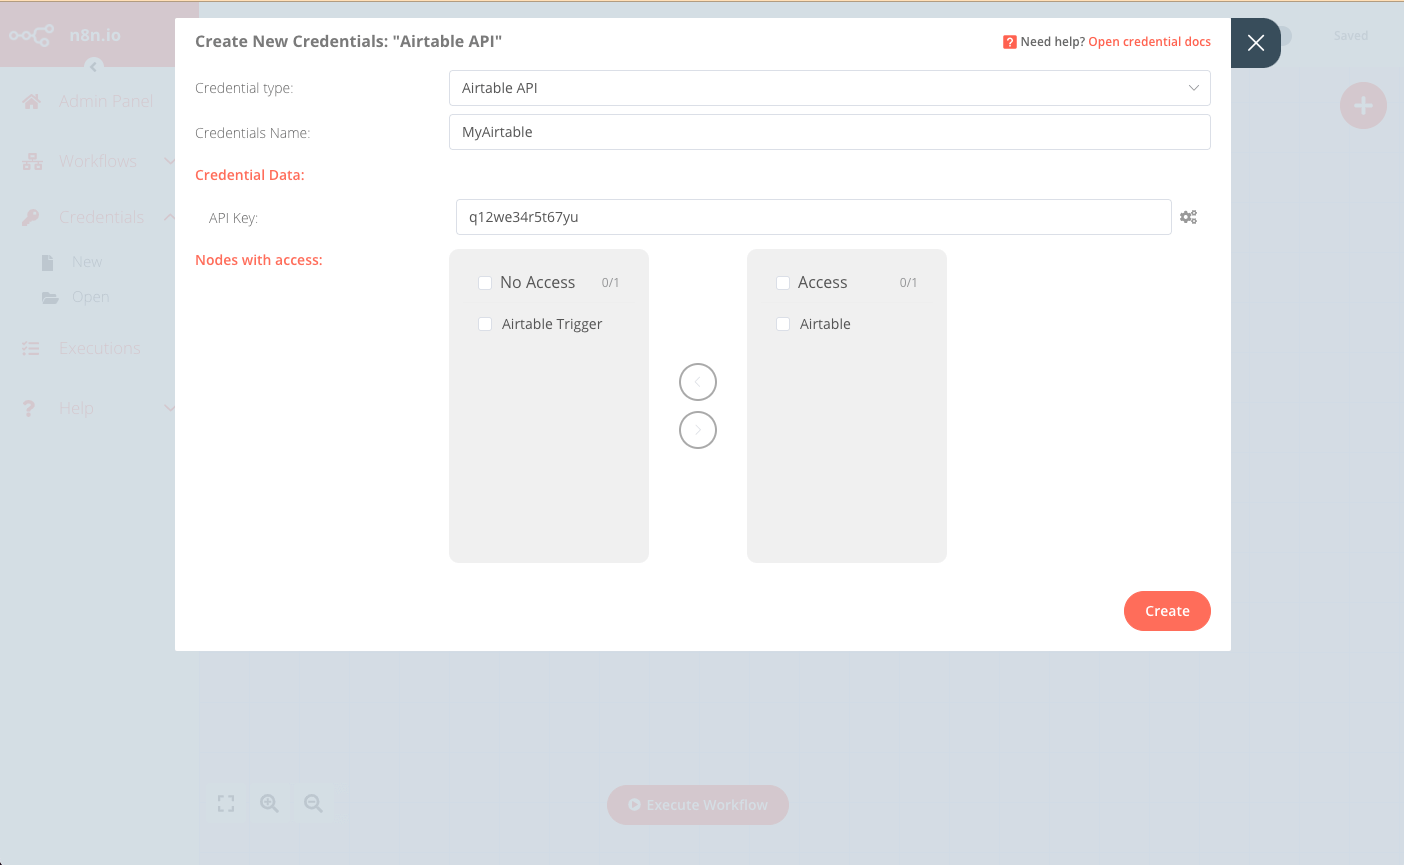
  3. In the Create New Credentials modal, enter the corresponding credentials details for the user, and select the nodes that will have access to these credentials. Create New Credentials modal
  4. Click Create to finish and save.

Using the API#

The frontend API used by the Editor UI can also be called to achieve the same result. The API endpoint is in the format: https://<n8n-domain>/rest/credentials.

For example, to create the credentials in the Editor UI example above, the request would be:

1
POST https://<n8n-domain>/rest/credentials

With the request body:

 1
 2
 3
 4
 5
 6
 7
 8
 9
10
11
12
{
   "name":"MyAirtable",
   "type":"airtableApi",
   "nodesAccess":[
      {
         "nodeType":"n8n-nodes-base.airtable"
      }
   ],
   "data":{
      "apiKey":"q12we34r5t67yu"
   }
}

The response will contain the ID of the new credentials, which you will use when creating the workflow for this user:

 1
 2
 3
 4
 5
 6
 7
 8
 9
10
11
12
13
14
15
16
17
18
{
   "data":{
      "name":"MyAirtable",
      "type":"airtableApi",
      "data":{
         "apiKey":"q12we34r5t67yu"
      },
      "nodesAccess":[
         {
            "nodeType":"n8n-nodes-base.airtable",
            "date":"2021-09-10T07:41:27.770Z"
         }
      ],
      "id":"29",
      "createdAt":"2021-09-10T07:41:27.777Z",
      "updatedAt":"2021-09-10T07:41:27.777Z"
   }
}

3. Create the workflow#

Best practice is to have a “base” workflow that you then duplicate and customize for each new user with their credentials (and any other details).

You can duplicate and customize your template workflow using either the Editor UI or API call.

Using the Editor UI#

  1. From the menu select Workflows > Open to open the template workflow to be duplicated.

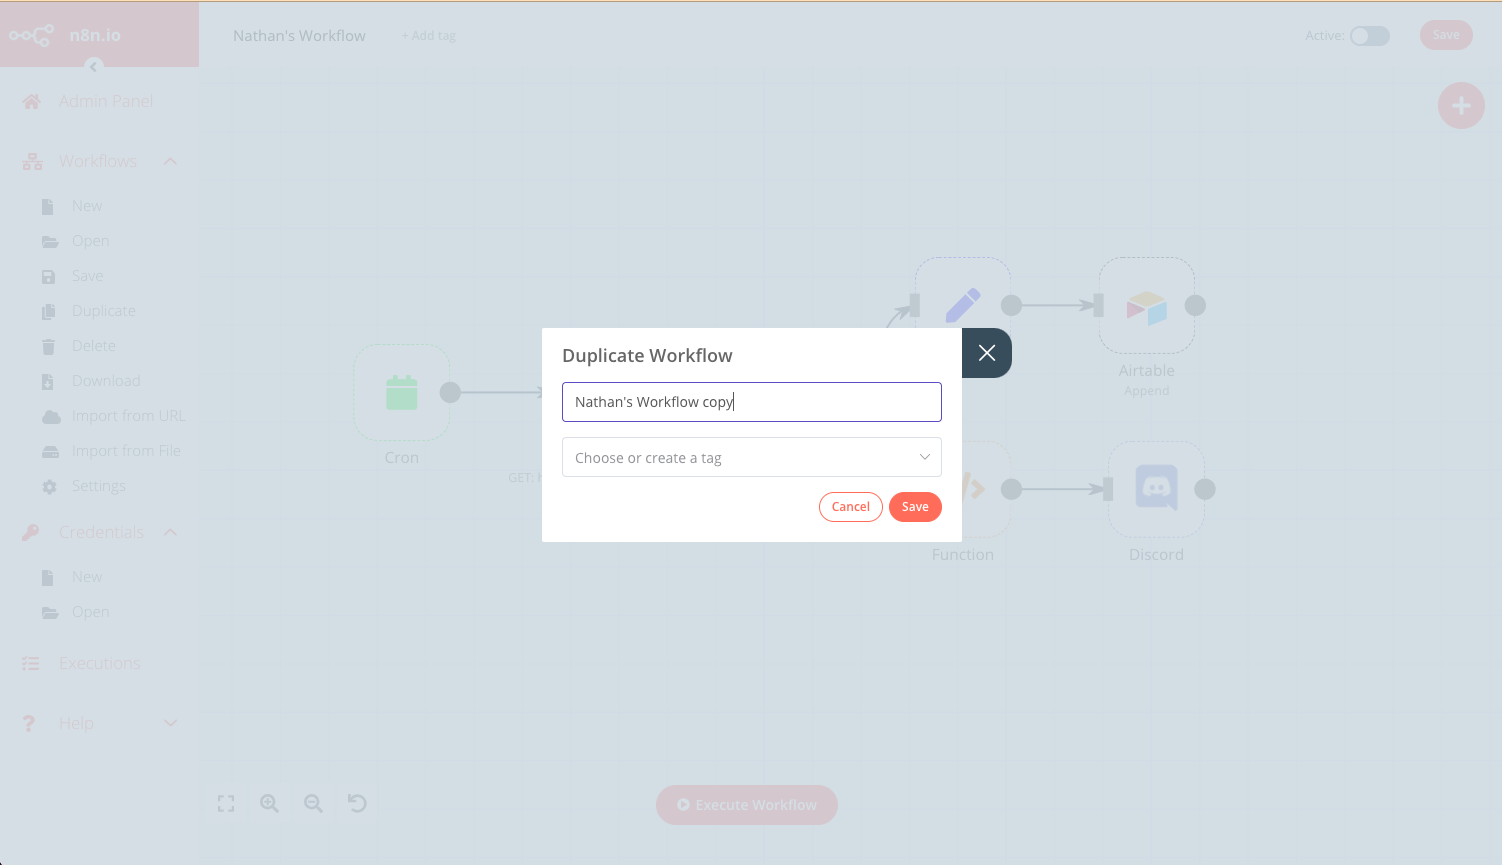
  2. Select Workflows > Duplicate, then enter a name for this new workflow and click Save. Duplicate workflow

  3. Update all relevant nodes to use the credentials for this user (created above).

  4. Save this workflow set it to Active using the toggle in the top-right corner.

Using the API#

  1. Fetch the JSON of the template workflow using the endpoint: https://<n8n-domain>/rest/workflows/<workflow_id>
    1
    GET https://<n8n-domain>/rest/workflows/1012
    

The response will contain the JSON data of the selected workflow:

  1
  2
  3
  4
  5
  6
  7
  8
  9
 10
 11
 12
 13
 14
 15
 16
 17
 18
 19
 20
 21
 22
 23
 24
 25
 26
 27
 28
 29
 30
 31
 32
 33
 34
 35
 36
 37
 38
 39
 40
 41
 42
 43
 44
 45
 46
 47
 48
 49
 50
 51
 52
 53
 54
 55
 56
 57
 58
 59
 60
 61
 62
 63
 64
 65
 66
 67
 68
 69
 70
 71
 72
 73
 74
 75
 76
 77
 78
 79
 80
 81
 82
 83
 84
 85
 86
 87
 88
 89
 90
 91
 92
 93
 94
 95
 96
 97
 98
 99
100
101
102
103
104
105
106
107
108
109
110
111
112
113
114
115
116
117
118
119
120
121
122
123
124
125
126
127
128
129
130
131
132
133
134
135
136
137
138
139
140
141
142
143
144
145
146
147
148
149
150
151
152
153
154
155
156
157
158
159
160
161
162
163
164
165
166
167
168
169
170
171
172
173
174
175
176
177
178
179
180
181
182
183
184
185
186
187
188
189
190
191
192
193
194
195
196
197
198
199
200
201
202
203
204
205
206
207
208
209
210
211
212
213
214
215
216
217
218
219
220
221
222
223
224
225
226
227
228
{
  "data": {
    "id": "1012",
    "name": "Nathan's Workflow",
    "active": false,
    "nodes": [
      {
        "parameters": {},
        "name": "Start",
        "type": "n8n-nodes-base.start",
        "typeVersion": 1,
        "position": [
          130,
          640
        ]
      },
      {
        "parameters": {
          "authentication": "headerAuth",
          "url": "https://internal.users.n8n.cloud/webhook/custom-erp",
          "options": {
            "splitIntoItems": true
          },
          "headerParametersUi": {
            "parameter": [
              {
                "name": "unique_id",
                "value": "recLhLYQbzNSFtHNq"
              }
            ]
          }
        },
        "name": "HTTP Request",
        "type": "n8n-nodes-base.httpRequest",
        "typeVersion": 1,
        "position": [
          430,
          300
        ],
        "credentials": {
          "httpHeaderAuth": "beginner_course"
        }
      },
      {
        "parameters": {
          "operation": "append",
          "application": "appKBGQfbm6NfW6bv",
          "table": "processingOrders",
          "options": {}
        },
        "name": "Airtable",
        "type": "n8n-nodes-base.airtable",
        "typeVersion": 1,
        "position": [
          990,
          210
        ],
        "credentials": {
          "airtableApi": "Airtable"
        }
      },
      {
        "parameters": {
          "conditions": {
            "string": [
              {
                "value1": "={{$json[\"orderStatus\"]}}",
                "value2": "processing"
              }
            ]
          }
        },
        "name": "IF",
        "type": "n8n-nodes-base.if",
        "typeVersion": 1,
        "position": [
          630,
          300
        ]
      },
      {
        "parameters": {
          "keepOnlySet": true,
          "values": {
            "number": [
              {
                "name": "=orderId",
                "value": "={{$json[\"orderID\"]}}"
              }
            ],
            "string": [
              {
                "name": "employeeName",
                "value": "={{$json[\"employeeName\"]}}"
              }
            ]
          },
          "options": {}
        },
        "name": "Set",
        "type": "n8n-nodes-base.set",
        "typeVersion": 1,
        "position": [
          800,
          210
        ]
      },
      {
        "parameters": {
          "functionCode": "let totalBooked = items.length;\nlet bookedSum = 0;\n\nfor(let i=0; i < items.length; i++) {\n  bookedSum = bookedSum + items[i].json.orderPrice;\n}\nreturn [{json:{totalBooked, bookedSum}}]\n"
        },
        "name": "Function",
        "type": "n8n-nodes-base.function",
        "typeVersion": 1,
        "position": [
          800,
          400
        ]
      },
      {
        "parameters": {
          "webhookUri": "https://discord.com/api/webhooks/865213348202151968/oD5_WPDQwtr22Vjd_82QP3-_4b_lGhAeM7RynQ8Js5DzyXrQEnj0zeAQIA6fki1JLtXE",
          "text": "=This week we have {{$json[\"totalBooked\"]}} booked orders with a total value of {{$json[\"bookedSum\"]}}. My Unique ID: {{$node[\"HTTP Request\"].parameter[\"headerParametersUi\"][\"parameter\"][0][\"value\"]}}"
        },
        "name": "Discord",
        "type": "n8n-nodes-base.discord",
        "typeVersion": 1,
        "position": [
          1000,
          400
        ]
      },
      {
        "parameters": {
          "triggerTimes": {
            "item": [
              {
                "mode": "everyWeek",
                "hour": 9
              }
            ]
          }
        },
        "name": "Cron",
        "type": "n8n-nodes-base.cron",
        "typeVersion": 1,
        "position": [
          220,
          300
        ]
      }
    ],
    "connections": {
      "HTTP Request": {
        "main": [
          [
            {
              "node": "IF",
              "type": "main",
              "index": 0
            }
          ]
        ]
      },
      "Start": {
        "main": [
          []
        ]
      },
      "IF": {
        "main": [
          [
            {
              "node": "Set",
              "type": "main",
              "index": 0
            }
          ],
          [
            {
              "node": "Function",
              "type": "main",
              "index": 0
            }
          ]
        ]
      },
      "Set": {
        "main": [
          [
            {
              "node": "Airtable",
              "type": "main",
              "index": 0
            }
          ]
        ]
      },
      "Function": {
        "main": [
          [
            {
              "node": "Discord",
              "type": "main",
              "index": 0
            }
          ]
        ]
      },
      "Cron": {
        "main": [
          [
            {
              "node": "HTTP Request",
              "type": "main",
              "index": 0
            }
          ]
        ]
      }
    },
    "createdAt": "2021-07-16T11:15:46.066Z",
    "updatedAt": "2021-07-16T12:05:44.045Z",
    "settings": {},
    "staticData": null,
    "tags": []
  }
}

  1. Save the returned JSON data and update any relevant credentials and fields for the new user.

  2. Create a new workflow using the updated JSON as the request body at endpoint: https://<n8n-domain>/rest/workflows

    1
    POST https://<n8n-domain>/rest/workflows/
    

The response will contain the ID of the new workflow, which you will use in the next step.

  1. Lastly, activate the new workflow:
    1
    PATCH https://<n8n-domain>/rest/workflows/1012
    

Passing the additional value active in your JSON payload:

1
2
3
4
5
// ...
"active":true,
"settings": {},
"staticData": null,
"tags": []

Single workflow#

There are four steps to follow to implement this method:

  • Obtain the credentials for each user, and any additional parameters that may be required based on the workflow. See Obtain user credentials above.
  • Create the n8n credentials for this user. See Create user credentials above.
  • Create the workflow.
  • Call the workflow as needed.

Create the workflow#

The details and scope of this workflow will vary greatly according to the individual use case, however there are a few design implementations to keep in mind:

  • This workflow must be triggered by a Webhook node.
  • The incoming webhook call must contain the user’s credentials and any other workflow parameters required.
  • Each node where the user’s credentials are needed should use an expression so that the node’s credential field reads the credential provided in the webhook call.
  • Save and activate the workflow, ensuring the production URL is selected for the Webhook node. Refer to webhook node for more information.

Call the workflow#

For each new user, or for any existing user as may be needed, call the webhook defined as the workflow trigger and provide the necessary credentials (and any other workflow parameters).